
Building fabric
How do you find the right U-value for an existing wall, floor or roof?
Choosing the right U-values is one of the most important parts of a heat loss survey. But how do you pick one when you can't see inside the wall, there are no original drawings, and the house has been altered three times since it was built?
The short answer
A U-value is how much heat gets through one square metre of a wall, floor, roof, window or door for every degree of difference between inside and out, in W/m²K. Lower is better. Every bit of fabric heat loss in a calculation is U-value × area × temperature difference, so a wrong U-value goes straight into the radiator and heat pump sizes.
For an existing house there are five realistic ways to get one:
- Pick a standard construction from a catalogue, when you know roughly what the element is made of.
- Estimate it from age and construction using the RdSAP tables, when you know the age and type but not the build-up.
- Use a known U-value from a SAP report, building control record, manufacturer or an in-situ measurement.
- Build it up from the materials, layer by layer, when you know what's in it.
- Reuse a construction you've already established on a previous job. That's a shortcut, not a method: the value still came from one of the four above.
No route is automatically the most accurate. The right one is whichever best matches the evidence you've actually got for that house. And what matters most is getting the construction right: in the example below, an uninsulated stone wall and an internally insulated one are around seven times apart.
What a U-value actually is
Three terms get mixed up, so it's worth pinning them down:
- Thermal conductivity (λ, W/mK) is a property of a material. Stone conducts heat well (about 2.3 for sandstone); expanded polystyrene barely does (about 0.035 to 0.038).
- Thermal resistance (R, m²K/W) is how much one layer of that material resists heat: its thickness in metres divided by its λ. Thicker and less conductive means more resistance.
- U-value (W/m²K) is for the whole element. Add up the resistance of every layer, plus a small allowance for the air films on each face, and take one over the total.
You'll see these written as symbols and units: λ (the Greek letter lambda) for conductivity in W/mK, R for resistance in m²K/W, U for the U-value in W/m²K. In each unit W is the watts of heat flowing, m or m² is the thickness or the area it flows through, and K is one degree of temperature difference across it, the same size as a degree Celsius. So "sandstone, 2.3 W/mK" means a metre-thick slab passes 2.3 watts through each square metre for every degree of difference; polystyrene at 0.038 passes about sixty times less.
U = 1 ÷ (Rsi + R1 + R2 + … + Rse)
The air-film allowances are fixed by BS EN ISO 6946: for a wall, 0.13 on the inside face (Rsi) and 0.04 on the outside (Rse). Leave them out and the wall looks worse than it is.
One more thing a proper U-value includes is repeating bridging: timber studs running through insulation, joists through a loft, mortar joints in blockwork. Those happen every few hundred millimetres across the whole element, so they belong in its U-value. That's different from junctions like lintels and wall-floor edges, which are added separately as a thermal bridging allowance (see our guide to thermal bridging). Keep the studs in the U-value and the junctions in the allowance. Whether anything gets counted twice depends on how the U-value you're using was derived, so check what a quoted figure already includes.
How to determine a U-value: five practical routes
| Route | Use it when | Strength | Watch out for |
|---|---|---|---|
| Standard construction from a catalogue | You can identify the build-up and a matching entry exists | Quick, consistent, already includes surface resistances and typical bridging | Picking the nearest-looking entry when the real wall is different |
| Estimate from age and construction (RdSAP) | You know the age band and wall type but can't see inside | Recognised, defensible, the same defaults EPC assessors use | It's an average for that age and type; refurbishment since then isn't in it |
| Known U-value | You have a SAP report, building control record, manufacturer's figure or in-situ measurement | Can be the best evidence there is, if it applies to this element as installed | Check what it covers: centre-pane or whole window, with or without bridging |
| Build it up from materials | You know the layers and thicknesses | Reflects the actual construction, including upgrades | Only as good as the layers you entered; guessed thicknesses give a precise-looking wrong answer |
| Reuse a saved construction | You've already established it on a similar job | Saves time, keeps your work consistent | It carries the original source's assumptions; check they still apply |
A word on measurement. A heat flux meter left on a wall for a week or two (BS ISO 9869) gives direct evidence of how that wall performs, rather than relying on what you assume it's made of. It still depends on suitable conditions, sensible sensor placement and a representative patch of wall, so it isn't assumption-free, but it's the closest you'll get. It's rare on a domestic survey because of the time and cost, and most useful on a traditional building where the default looks wrong.
How to tell what a wall is made of
Before picking a route, get the construction right. The clues below are indicators, not proof: render, plaster, external insulation, later linings and odd local construction can all mislead, and brick faces can be laid to look like something they're not. Where the identification makes a real difference to the heat loss, look for a second piece of evidence.
- Wall thickness at a window or door reveal. Around 230 mm with a brick pattern of alternating long and short faces usually means solid brick. Around 270 to 300 mm with all long faces means a cavity. Anything over 400 mm in an older house is likely stone or a filled cavity with a lining.
- Drill holes in the mortar in a regular grid, often filled in a slightly different colour, point to injected cavity insulation. They don't tell you it was done well or that the fill is complete.
- Signs of an internal lining: reveals deeper than the masonry would explain, sockets set unusually deep, a hollow sound when you knock, a skirting standing proud of the wall.
- In the loft: check insulation depth in several places, not just by the hatch, and look at the eaves where it often thins out or stops.
- Ask. Owners usually know if the cavity was filled or the loft was topped up, and sometimes have the paperwork.
Worked example: a 305 mm stone wall, insulated and not
Take a traditional solid wall of 305 mm sandstone, a common build in older houses across Wales, Scotland and the north. We'll look at 20 m² of it at a 24°C difference (21°C inside, −3°C out).
A. Uninsulated, plastered
| Layer | Thickness | Conductivity λ (W/mK) | Resistance R (m²K/W) |
|---|---|---|---|
| Inside air film (Rsi) | 0.13 | ||
| Dense plaster | 13 mm | 0.57 | 0.023 |
| Sandstone | 305 mm | 2.3 | 0.133 |
| Outside air film (Rse) | 0.04 | ||
| Total | 0.326 |
U = 1 ÷ 0.326 ≈ 3.07 W/m²K, call it 3.1. Notice how little the stone itself contributes: the two air films together do almost as much as 305 mm of sandstone.
B. Insulated on the inside
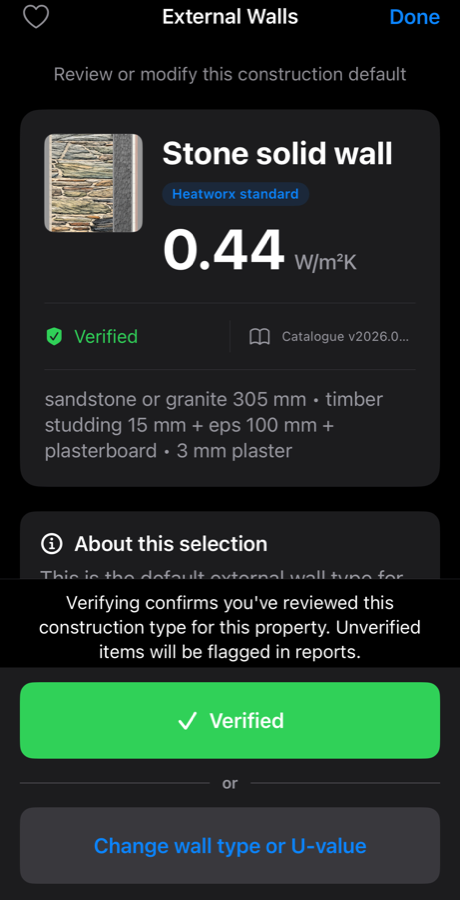
Now line it with 100 mm of EPS between timber studs, plasterboard and a skim. That's the build-up in the screenshot further down, which the Heatworx catalogue gives as 0.44 W/m²K.
- Insulation alone, ignoring the studs: 100 mm of EPS adds about 2.6 m²K/W, the total comes to about 3.0, and U ≈ 0.33.
- With the studs: timber conducts about three and a half times as well as EPS, so every stud is a strip where the insulation works less well. BS EN ISO 6946 has a method for combining the two, and the result is always worse than the insulation alone. The catalogue entry comes out at 0.44.
The catalogue value of 0.44 is higher than the insulation-only estimate of 0.33. Repeating bridges like studs passing through insulation are one reason a complete construction performs worse than a simple layer-by-layer sum suggests. Don't try to reverse-engineer a catalogue figure to work out exactly why; use it as given, or build up your own from layers you've actually identified.
What it does to the heat loss
| Assumption | U-value (W/m²K) | Heat loss through 20 m² at 24°C |
|---|---|---|
| A. Uninsulated, calculated | 3.07 | 1,475 W |
| B. Insulated, catalogue | 0.44 | 210 W |
| B. Insulated, ignoring studs | 0.33 | 160 W |
One wall, about 1,260 W apart depending on whether it's been lined. Across a whole house that's the difference between one heat pump size and the next. So on survey, look for the evidence of a lining before you choose.
Traditional walls have a twist of their own. Between 2009 and 2012 the SPAB measured the in-situ U-values of 77 traditional solid walls and compared them with the standard BS EN ISO 6946 calculation. In 77% of cases the calculation overestimated the heat loss: the real walls, with their rubble cores, lime mortar and air pockets, lost less than the textbook layers predicted (SPAB Research Report 1: U-value Report, Rye, revised 2012). That's a finding from one sample, not a rule for every old house, but it does mean a calculated 3.1 for an uninsulated stone wall is a cautious figure rather than a certainty.
Floors and windows are different
Ground floors don't have a U-value you can read off the construction alone. Heat goes down into the ground and out to the edges, so a calculated floor U-value (BS EN ISO 13370) depends on the floor's shape as well as what it's made of: the exposed perimeter divided by the floor area, plus the soil type underneath, which is why a survey asks for it. A small, square floor loses proportionally less than a long, thin one with the same construction. Not every method goes that far: the RdSAP route, which the MCS calculator uses for its defaults, has simplified procedures and standard figures. So for a floor, be clear whether you're looking at a detailed calculated value or a standard estimate. We'll cover how CIBSE 2026 and MCS each treat floors in a separate guide.
Windows and doors come with a trap: there are two U-values. The centre-pane figure (Ug) is for the glass alone. The whole-window figure (Uw) includes the frame and the spacer bar round the edge of the glass, and it's usually worse. A heat loss calculation needs Uw. Manufacturers often quote Ug because it's the better number, so check which one you've been given.
How CIBSE 2026 and MCS source U-values
Both methods use the same formula. Where they differ is the default you fall back on when you have no better evidence, and it isn't as simple as "MCS uses RdSAP, CIBSE uses CIBSE".
- MCS heat load calculator: uses both, according to its own documentation. Defaults for external walls, roofs, windows and floors come from the RdSAP 10 reference tables, by age band and construction type. Defaults for internal elements (internal walls, internal doors, partitions to other spaces) come from the CIBSE Domestic Heating Design Guide 2026. A known U-value can replace either.
- CIBSE 2026: the Domestic Heating Design Guide has its own reference tables, organised by what the element is made of rather than when it was built: wall constructions by type and era of insulation, roofs by form and insulation depth, ground floors by shape and soil, windows and doors by frame and glazing. For a construction you can identify, the CIBSE figure and the RdSAP figure for the same build-up are close; they part company on a house that has been upgraded since it was built, where an age-band estimate can't know about the loft top-up or the lined wall.
There's one trap that crosses over from the thermal bridging guide, and it's worth knowing because two apparently identical wall specifications can give different results. In the MCS calculator, an external wall on a pre-2003 house that takes its U-value from the RdSAP default gets a bridging allowance of 0.15 W/m²K. Enter a known U-value for the same wall without a bridging factor of your own, and the calculator's documented default for that case is 0.10 instead. The U-value you typed may be identical to the table figure, and the wall still comes out different. This is how that calculator behaves, not a rule of either method, so check the bridging line whenever you replace a default.
Precision isn't accuracy
A calculated U-value of 0.437 W/m²K looks more trustworthy than a catalogue figure of 0.45. It isn't, if the layers behind it were guesses. Three decimal places from guessed thicknesses is a precise answer to the wrong question.
The same goes the other way. An RdSAP estimate isn't wrong just because it's an estimate. For an unaltered house of a known age and type, it may well be the most defensible figure you have. What matters is whether the evidence fits the house: the age, what you could see, what the customer told you, and what's been done since it was built.
As a rough order of preference, when you have the choice:
- Documentation or measurement that applies to this element: a SAP report for the house, building control records, an in-situ measurement.
- An identified construction with a matching catalogue entry or a layer-by-layer calculation.
- An estimate by age and type when you can't establish the construction.
That's a guide to which evidence to prefer, not a ranking of accuracy. A good estimate beats a confident mis-identification every time. That's the point of verifying a construction. It doesn't mean the U-value has been measured or proven. It means someone has looked at this house and decided the chosen construction is a fair description of it, rather than leaving a default to stand by accident.
How Heatworx handles it
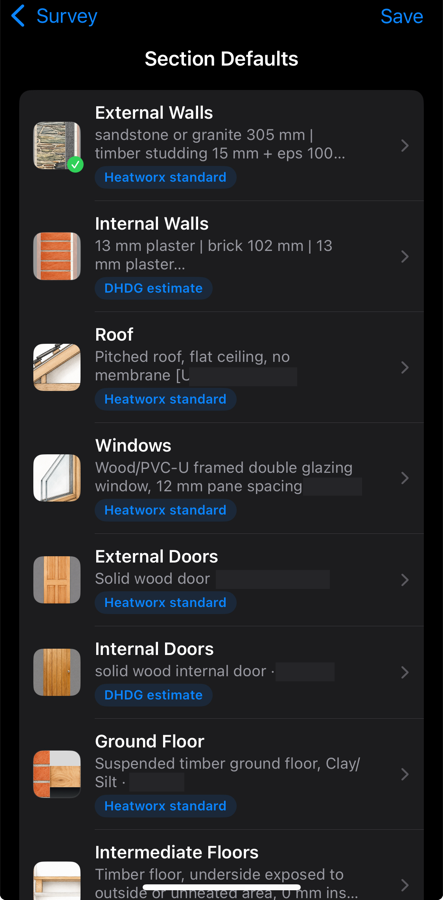

Set the house up once, then deal with the exceptions. A survey starts with section defaults for every element type: external walls, internal walls, roof, windows, external and internal doors, ground floor and intermediate floors. Each default shows its construction, its U-value and where it came from: "Heatworx standard" for an entry from the Heatworx construction catalogue, "DHDG estimate" for a figure from the CIBSE Domestic Heating Design Guide, "RdSAP estimate" for an age-and-construction estimate. Rooms take the defaults unless you override them, so a lined front room or a newer extension can have its own construction without changing the rest of the house. A room's own override outranks the section default, and it stays put if you later change the default; there's a "Reset to section default" when you want the room to follow the house again.
The same five routes as this guide. For any element you choose how the U-value is established: a standard type from the catalogue, an estimate from age and construction (RdSAP), a U-value you already have, a build-up from materials, or one of your favourites. The value shown is always the base fabric U-value. Junction losses are added separately at room level, so nothing is counted twice. A build-up uses the fixed surface resistances above, adds mortar joints to masonry layers automatically, and lets you declare a stud zone as a mixed layer with its timber fraction so the repeating bridge is in the U-value where it belongs.
Verified means reviewed. Each default can be marked as verified, which records that you've looked at that construction for this property. It isn't a claim that the U-value has been measured. Anything left unverified is listed by name in the report, so a default nobody has checked can't slip through unnoticed. The review card also shows which version of the catalogue the entry came from, so a figure can be traced back if the catalogue is updated later.
Common mistakes when choosing U-values
- Picking an insulated construction because it looks the most likely. If you can't see the insulation, don't assume it. Look for the evidence, or record it as an assumption.
- Treating every wall as the same. Extensions, bay windows, rear additions and lined rooms are often built differently from the main house.
- Assuming the loft is insulated to full depth everywhere. It's often thin at the eaves, round the hatch and under boarded storage areas.
- Using the centre-pane window figure. The calculation needs the whole-window U-value, frame included.
- Leaving out the surface resistances or the studs when building a U-value up by hand. Both are part of the real wall.
- Forgetting that entering a known U-value in the MCS calculator can change its bridging default. Check both together.
Quick questions
How do you find the U-value of an existing wall?
Identify the construction as well as you can on survey, then use the best route your evidence supports: a matching catalogue entry, the RdSAP estimate for its age and type, a documented or measured value, or a layer-by-layer calculation.
Can you estimate U-values from the age of a house?
Yes. RdSAP gives default U-values by age band and construction type, and the MCS calculator uses them. They're averages, so they won't reflect insulation added since the house was built.
How do you calculate a U-value from R-values?
Add up the resistance of each layer (thickness ÷ conductivity), add 0.13 for the inside surface and 0.04 for the outside on a wall, and divide one by the total. Allow for any timbers running through the insulation.
What U-value should you use for a solid stone wall?
It depends on thickness and whether it's been lined. An uninsulated 305 mm sandstone wall calculates at about 3.1 W/m²K, and the same wall lined with 100 mm of insulation between studs at about 0.44. In-situ measurements often find traditional walls perform better than calculated.
What's the difference between RdSAP and calculated U-values?
RdSAP gives a typical figure for a construction type and age. A calculated value reflects the specific layers you've identified, so it's better when you know them, and worse when you're guessing.
How accurate do U-values need to be for heat pump sizing?
Accurate enough that the construction is right. In our example, getting a stone wall's lining wrong changed its heat loss around sevenfold; arguing over the second decimal place rarely changes the heat pump size.
The bottom line
The most important decision isn't which method to use, it's whether you've identified the construction correctly. Pick the route that matches your evidence, record where the figure came from, and review every default rather than letting it stand by accident.
Sources
- BS EN ISO 6946: Building components and elements. Thermal resistance and thermal transmittance
- BS EN ISO 13370: Thermal performance of buildings. Heat transfer via the ground
- BS ISO 9869-1: In-situ measurement of thermal resistance and thermal transmittance
- BR 443: Conventions for U-value calculations (BRE)
- RdSAP 10 Specification, U-value tables
- MCS Heat Load Calculator: U-values and Thermal bridging
- CIBSE Domestic Heating Design Guide 2026 (paywalled)
- Rye, C. (2012). SPAB Research Report 1: U-value Report (revised). Historic England.
Related guides
Calculation note
The worked example uses published material conductivities and the BS EN ISO 6946 surface resistances; the 0.44 is a Heatworx catalogue entry. No CIBSE or RdSAP table values are reproduced. The MCS calculator's behaviour on known U-values is as its documentation describes and as we have reconciled against its exported workings.